
How to Install a Lace Front Wig for a Flawless Natural Look
So you're ready to master the art of the lace front wig install? It's a game-changer, for sure. Getting it right comes down to a few key stages: creating that perfect flat base, securing the wig (with or without glue), cutting the lace so it looks like a real hairline, and then blending everything together for that "is it hers?" finish. Once you nail these steps, you'll be able to get a secure and flawless look every single time.
Your Guide to a Perfect Lace Front Wig Install
Welcome to the only guide you'll ever need for a flawless lace front wig installation. Whether this is your first time or you're just looking to sharpen your skills, we're spilling all the professional secrets to a seamless look that will turn heads for all the right reasons.
Forget those confusing tutorials. This guide is packed with real-world tips I've picked up over the years to help you get a secure, comfortable, and totally undetectable install right at home. A perfect application is about so much more than just glue and lace; it's about the entire process, from start to finish.
What to Expect in This Guide
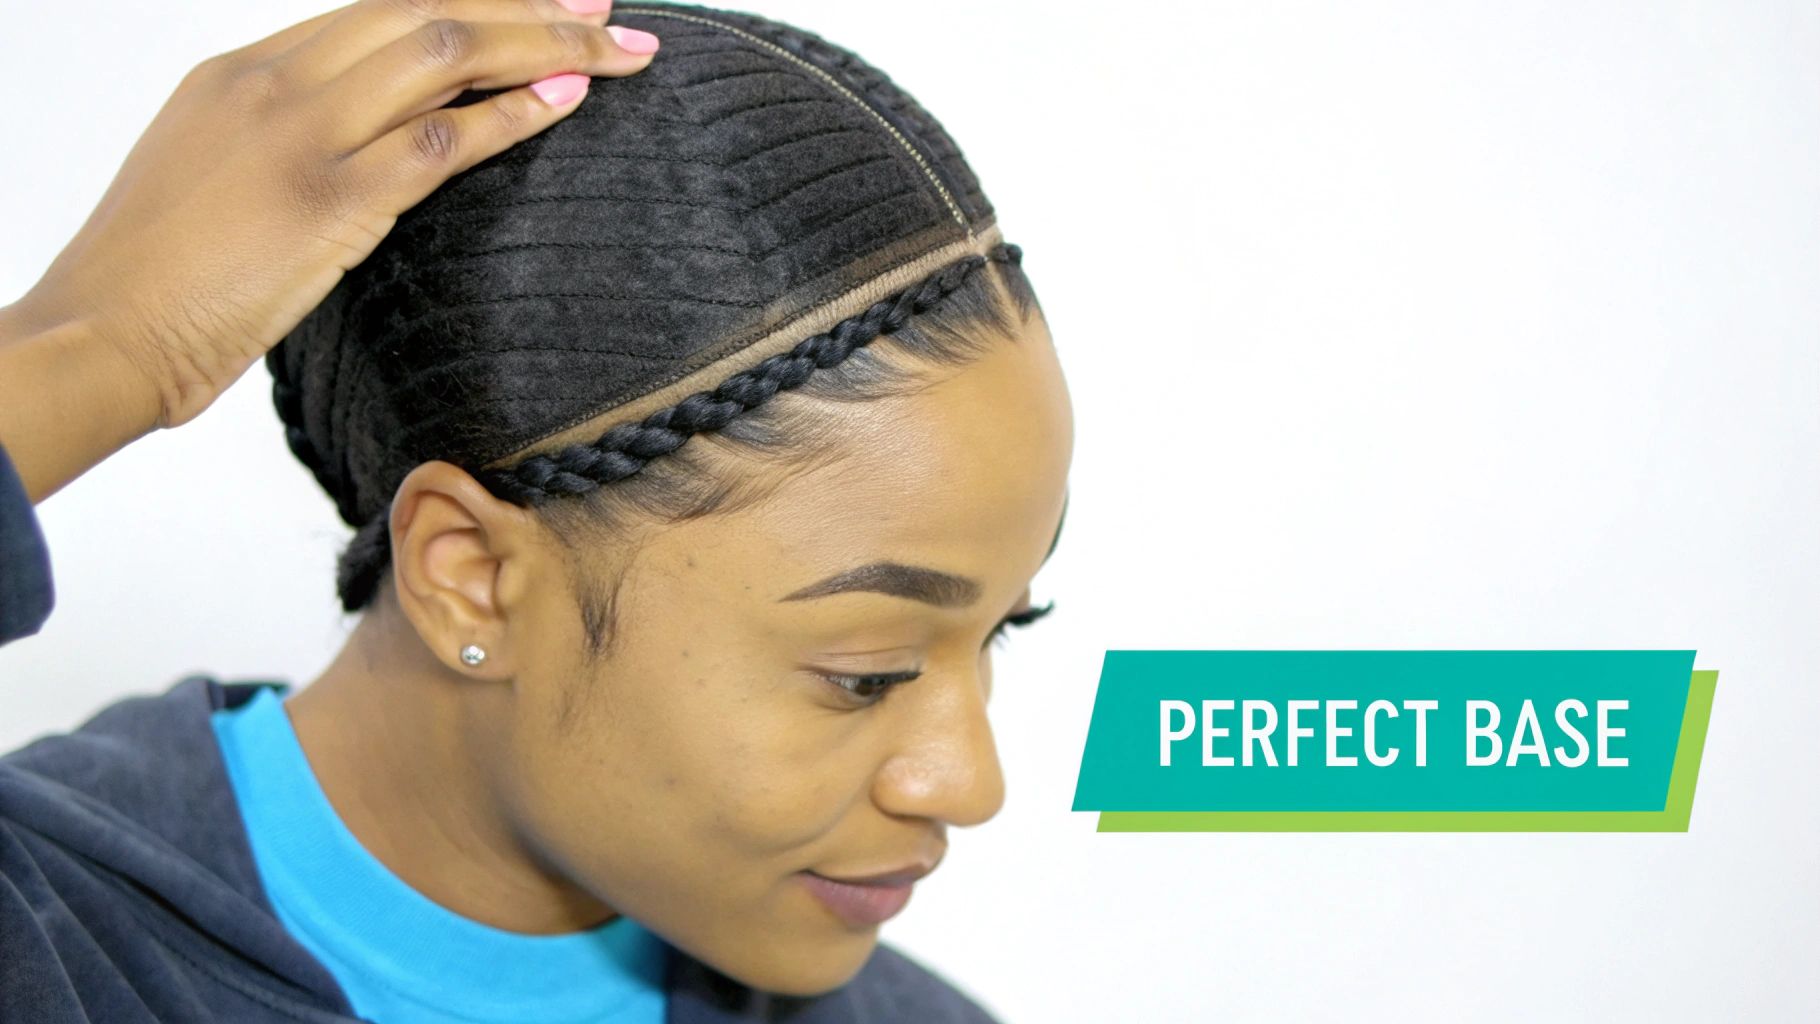
We're going to break down every single part of how to install a lace front wig, so you feel totally confident. We’ll kick things off with the most critical part: creating a perfectly flat base. I can't stress this enough—this step is non-negotiable if you want a natural look, and I'll show you how to get it with techniques like flat cornrows.
From there, we'll dive into all the tools and products you'll need.
Here's a peek at what we'll cover:
- Preparation: You'll discover why a clean hairline and a properly tinted wig cap are the real secrets to a melt that looks just like your scalp.
- Adhesive Options: We'll compare adhesives versus going glueless, featuring some amazing choices from Elise Beauty Supply, so you can pick what works for your lifestyle and skin.
- Application Techniques: Learn the right way to apply your wig, whether you're using a strong-hold glue for long-term wear or a temporary spray for a quick, glueless style.
- Customization and Blending: This is where the magic happens. I'll teach you how to cut the lace, create natural-looking baby hairs, and use a little makeup to make the wig completely your own.
A truly great install is one where no one can tell you're wearing a wig. The goal is to create a look so natural and seamless that it feels like the hair is growing directly from your scalp.
By the time you finish this guide, you won’t just know the steps; you'll understand the why behind them. That’s the kind of knowledge that helps you troubleshoot any issues and customize your application for a perfect result, every single time you put on your favorite unit.
Let's get started on your journey to a flawless finish.
For those who want a quick snapshot of the process, this table breaks down the entire installation journey. It's a handy reference to keep in mind as we go through each step in detail.
Lace Front Wig Installation Quick Guide
| Phase | Key Objective | Pro Tip from Elise Beauty Supply |
|---|---|---|
| Preparation | Create a smooth, flat foundation for the wig. | Your braid-down is everything! Small, flat cornrows will prevent bumps and ensure the wig lays completely flat. |
| Application | Secure the wig to the hairline using your chosen method. | Less is more with adhesive. Apply a thin, even layer and let it get tacky before placing the lace for the strongest hold. |
| Customization | Cut the lace and pluck the hairline for a natural look. | Always cut the lace in a zig-zag motion, not a straight line. This mimics a real hairline and helps it blend better. |
| Blending | Melt the lace into the skin for an undetectable finish. | A bit of foundation powder on the lace and a melt band worn for 10-15 minutes will work wonders. |
| Styling | Style baby hairs and the wig to complete the look. | Use a foaming mousse, like the EBIN NEW YORK 24 Hour Edge Tamer, on an edge brush for soft, natural baby hairs that stay put. |
This overview gives you the big picture, but the real magic is in the details. Now, let's dive into the first and most crucial phase: preparing your natural hair.
Laying the Perfect Foundation for Your Wig
A truly seamless wig application starts long before you even touch the unit. Think of it like a painter prepping a canvas—you wouldn't start on a bumpy, dusty surface and expect a masterpiece. Creating a perfectly flat and clean foundation is the most critical first step, and it's what separates a professional-looking finish from an obvious one.
This initial stage is all about making sure your wig lies completely flat, without any lumps or bumps that scream "I'm wearing a wig!" It's also about protecting your natural hair, keeping it safe and healthy underneath.
Get Your Hair as Flat as Possible
When it comes to getting a flat base, the undisputed champion is flat cornrows. Braiding your hair down in small, neat cornrows that go straight back is the best way to eliminate bulk and create an even surface for the wig. This is the method professionals swear by because it works for every hair type and length.
Now, if you have shorter hair, you might be able to get away with just slicking it back with a strong hold gel and wrapping it. For those with really long or thick hair, a low, tightly secured bun can work in a pinch, but I'll be honest—cornrows almost always give you a much flatter, more natural-looking result.
Here's a quick breakdown of your options:
- Cornrows: This is your best bet for a completely smooth, bump-free install. It's perfect for long-term wear because it keeps your hair securely tucked away and protected.
- Low Bun/Wrap: This can work for shorter-term wear or if you're not a braider. The main risk is creating a slight bump at the back if it's not secured perfectly flat.
- Gel Down: This method is really only for very short hair. Just make sure the gel is bone-dry before you put on a wig cap, otherwise you could end up with scalp irritation.
Prep Your Skin and Hairline
Once your hair is secured, it's time to focus on your skin. This is a step people often rush, but it’s so important. Any oil, makeup, or leftover product on your hairline will stop your adhesive from gripping properly, which leads to those dreaded lifting edges.
To get it right, grab a cotton pad with a bit of an alcohol-based solution (basic rubbing alcohol works great) and gently wipe along your entire hairline where the lace will eventually sit. This simple move cleans off all the oils and creates the perfect canvas for your adhesive to bond to.
If your skin is on the sensitive side, this is also when you should apply a skin protectant. These products create a thin barrier between your skin and the adhesive, which helps prevent irritation without messing with the hold. It’s basically a primer for your wig glue.
The real secret to a long-lasting install isn't piling on more glue; it's starting with a perfectly clean, oil-free hairline. This one step can literally add days to your wear time.
Master the Wig Cap for a Flawless Melt
The wig cap is your secret weapon for making the lace look like it’s growing right out of your head. A good cap doesn't just protect your hair; it creates an even-toned base that helps the lace blend in and disappear. Thin, breathable stocking caps are a go-to for a reason. You can find some great natural stocking wig caps that work well for a huge range of skin tones.
Here's how to apply your wig cap like a pro for that perfect melt:
- Secure the Cap: First, pull the wig cap down over your head, making sure it covers all of your hair, including those little hairs at the nape of your neck.
- Apply a Holding Product: Grab a holding spray (like Got2B Glued) or a very thin layer of wig glue and apply it around the perimeter, right in front of your natural hairline.
- Melt it Down: Use a blow dryer on the cool setting to dry the product, pressing the cap into it as it dries. This locks the cap down flat against your skin.
- Trim the Extra: Carefully cut away the excess cap material around your ears and along your hairline.
- Tint for Invisibility: This is the game-changing step. Take a foundation powder or a lace tint spray that perfectly matches your skin tone and apply it to the cap right where your wig's part will be. This trick is what makes the lace on your wig practically vanish once it’s on.
Nailing these prep steps sets you up for a wig install that's not only secure and comfortable but, most importantly, completely undetectable. Trust me, the time you spend here will pay off big time in your final look.
Choosing Your Tools: From Glued to Glueless
Stepping into the world of wig installation can feel a little overwhelming at first. The biggest choice you'll make right out of the gate is how you want to secure your unit: are you looking for a traditional glued install for maximum security, or does a modern glueless approach sound more like your speed?
Your lifestyle, skin sensitivity, and how long you plan to wear your wig will all help guide you to the perfect match. There’s no single “right” way to do this; it's all about finding what makes you feel most confident and comfortable.
Let’s break down the go-to tools and techniques for both paths, so you can build your personal installation kit like a pro.
The Long-Haul Hold: Glued Installations
For anyone who needs their wig to stay put through absolutely anything—think intense workouts, humid weather, or a long work week—a glued installation is the gold standard. This method uses a liquid adhesive or strong wig tape to bond the lace directly to your skin, creating an incredibly secure and seamless hairline that can last for days or even weeks.
This is the technique stylists rely on for that celebrity-level "melt" that looks completely undetectable. You've probably heard of popular adhesives like Bold Hold and Ghost Bond; they're famous for their powerful, water-resistant holds. The key, though, is to pick one that suits your skin type, as many are formulated specifically for oily or sensitive skin.
To really nail a glued install, you’ll need a few essentials in your arsenal:
- Skin Protectant: This is a non-negotiable first step. It creates a barrier between your skin and the adhesive, which not only prevents irritation but also helps the glue grip even better.
- Lace Adhesive: Always go for a high-quality glue. The trick is to apply it in thin, even layers and—this is crucial—wait for it to become clear and tacky before you even think about laying the lace down.
- Adhesive Remover: Never, ever just pull off a glued wig. A good oil-based remover is essential to gently dissolve the bond without damaging your delicate hairline or the precious lace on your unit.
The explosion of at-home wig applications is impossible to ignore. In fact, the global lace front wig market hit an incredible $2.4 billion in 2024 and is projected to reach $4.9 billion by 2033. This massive growth is powered by people just like you, all seeking that flawless, salon-quality look from the comfort of home.
The Freedom of Glueless Installations
If the thought of adhesive makes you a bit nervous, or you just love the freedom of taking your wig off at night, the glueless method is about to become your best friend. This approach gives you a secure fit without the long-term commitment, making it perfect for beginners, anyone with sensitive skin, or people who just love to switch up their style on a whim.
Modern glueless wigs are brilliantly designed with features that help them stay put. Most come with an adjustable elastic band already inside the cap, letting you customize the tightness for a snug feel. Some even have silicone grips or combs that help anchor the wig firmly in place.
For an extra layer of security and that melted look without the commitment, a strong holding spray is a total game-changer. Products like the Ebin Wonder Lace Bond Spray deliver a firm, temporary hold that lasts all day but washes away easily with just water. You just spray it along your hairline, let it get tacky, and press the lace into it—the same principle as traditional glue, but without any of the messy removal.
Glued vs. Glueless Installation Methods
To help you decide which path is right for you, here’s a quick comparison of the two primary methods for securing a lace front wig. This should help you choose the best fit for your lifestyle.
| Feature | Glued Method (Adhesive/Tape) | Glueless Method (Sprays/Bands) |
|---|---|---|
| Hold Duration | Long-term (can last 1-4 weeks) | Short-term (typically daily wear) |
| Best For | Active lifestyles, long-term wear | Beginners, sensitive skin, daily changes |
| Application | More technique-sensitive; requires drying time | Quick and easy; minimal drying time |
| Removal | Requires an oil-based adhesive remover | Easily removed with water or by simply taking it off |
Ultimately, whether you choose the unshakeable security of a glued install or the daily convenience of a glueless one, having the right products makes all the difference. Building your perfect kit is the first real step toward achieving a flawless application every single time.
Time to Lay That Lace: The Wig Application Process Explained
With your foundation set and your edges protected, we’re moving on to the most crucial part of the process: installing your lace front wig. This is where skill and a steady hand come together to create a look that’s truly seamless. It’s the difference between just wearing a wig and making it look like it’s growing right from your scalp.
Whether you're going for a long-lasting glued install or prefer the freedom of a glueless method, the fundamentals are the same. It's all about precision, patience, and a bit of practice. Let's walk through both techniques so you can nail that "melted" look where the lace just disappears.
Securing Your Wig with Adhesive
For a hold that you can trust for days, the classic glue method is unbeatable. The real secret here isn't caking on the product; it's all about thin, even layers.
Start by dabbing a few dots of your favorite lace adhesive along your hairline, just in front of your wig cap. Don’t go overboard. Then, take the back of a small makeup brush or a little spatula and gently spread those dots into a super-thin, consistent layer.
Most modern glues need a few layers to build a strong bond. Let the first layer dry until it's completely clear and tacky to the touch—not wet! Once it’s tacky, go in with a second layer, and maybe even a third, letting each one dry completely in between.
The biggest rookie mistake is trying to lay the lace while the glue is still white and wet. Be patient. Waiting until the adhesive is clear and tacky creates an instant, powerful bond and saves you from a messy, sliding disaster.
Once that final layer is ready, it’s go-time. Grab your wig by the ear tabs and carefully line up the center of the lace with the middle of your forehead. Gently lay it down, starting from the center and smoothing it out toward your ears. This center-first approach is key to avoiding a lopsided install.
After the lace makes contact, grab a rat-tail comb and use the back of it to press the lace firmly into the adhesive. Make sure every single inch of the edge is secured.
Mastering the Glueless Install
The glueless method is a game-changer, offering incredible convenience without sacrificing that melted look. It’s perfect for anyone who loves to switch up their style or just can’t commit to glue. This approach is absolutely exploding in popularity.
In fact, the glueless wig market, currently valued at $780 million, is expected to skyrocket to an incredible $13.27 billion by 2033. It’s easy to see why—this method can slash installation time by up to 70% compared to a traditional glue-in. If you want to dive deeper, you can find more stats in market reports on the booming glueless wig industry.
For a glueless install, a strong-hold spray is your best friend.
- Spray the Hairline: Give your hairline a light mist of your chosen spray, applying it directly onto your wig cap.
- Let It Get Tacky: Just like with glue, you need to wait a beat for the spray to get sticky. A quick blast of cool air from your blow dryer can really speed this up.
- Place and Press: Use the same center-outward technique to position your wig. Once it's where you want it, press the lace down firmly into the tacky spray.
To get that flawless final melt, wrap an elastic melt band snugly around your hairline. Leave it on for about 10-15 minutes. When you take it off, you'll be amazed at how well the lace has blended into your skin.
Check out this infographic for a simple side-by-side look at the steps for both glued and glueless installs.
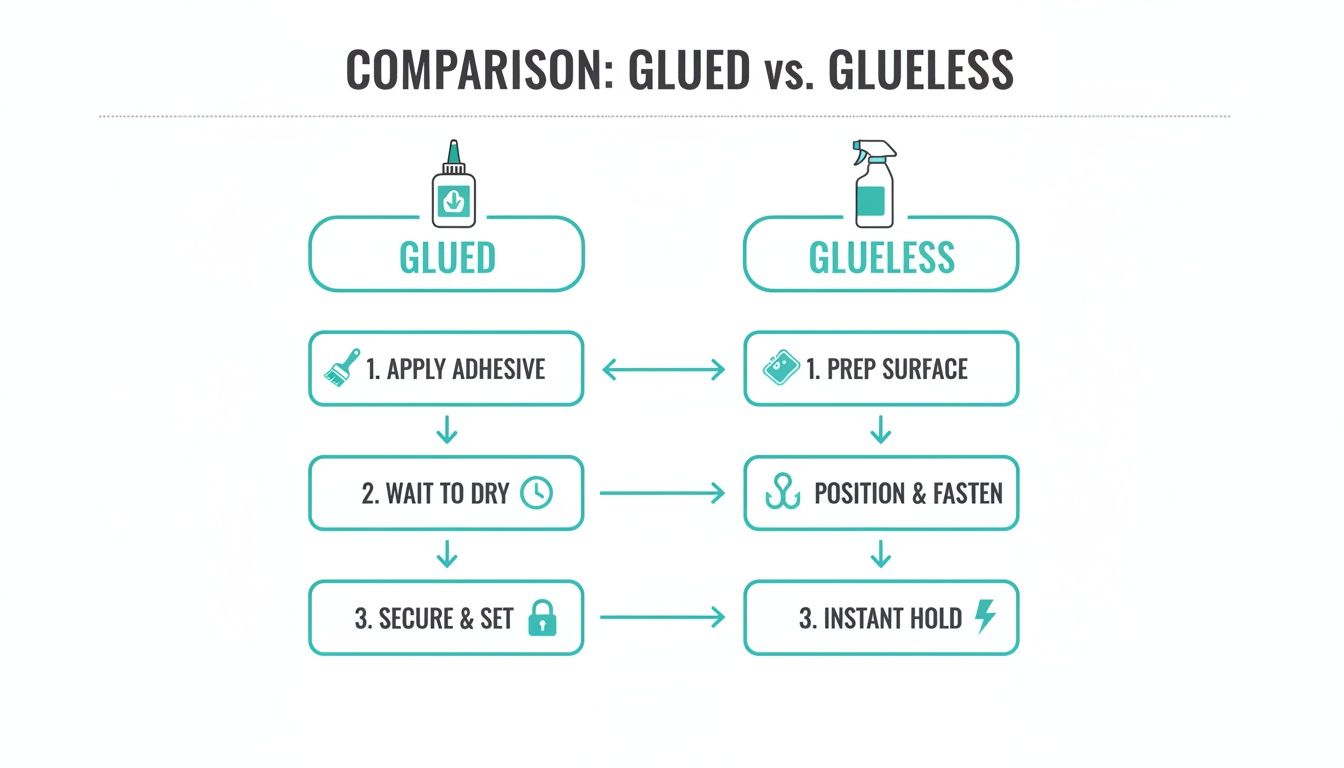
As you can see, the tools might be different, but the core goals of prepping your base and securing the lace are universal.
Cutting the Lace Like a Professional
Okay, let's talk about what might be the most nerve-wracking step for any beginner: cutting the lace. This is where the magic truly happens. A bad cut is an instant giveaway, so taking your time here is non-negotiable for getting that undetectable finish.
First rule: never, ever cut the lace in a straight line. Nothing screams "wig" louder than a perfectly straight hairline. Your goal is to mimic a natural hairline, which is always slightly imperfect.
Here’s my go-to technique:
- Get the Right Tools: A pair of small, sharp scissors works great, but an eyebrow razor gives you incredible control and a softer edge.
- Create a Jagged Edge: As you trim the excess lace, make small, zig-zagging motions. This little bit of texture is what helps the lace melt right into your skin.
- Leave a Little Room: Don’t cut right up against the hairline of the wig. Leave a tiny sliver of lace—about 1/8 of an inch—to work with. This prevents you from accidentally snipping off any of those precious baby hairs.
After you've trimmed the lace, you might still notice a faint line where it meets your skin. Don't panic! In the next section, we’ll cover all the tricks for blending that edge until it completely disappears.
Customizing Your Wig for an Undetectable Finish
Alright, your wig is on and secure. Now for the fun part—the artistry. This is where you go from just wearing a wig to making it look like it’s your own hair, growing right from your scalp. These finishing touches are the secrets to making that lace completely disappear.
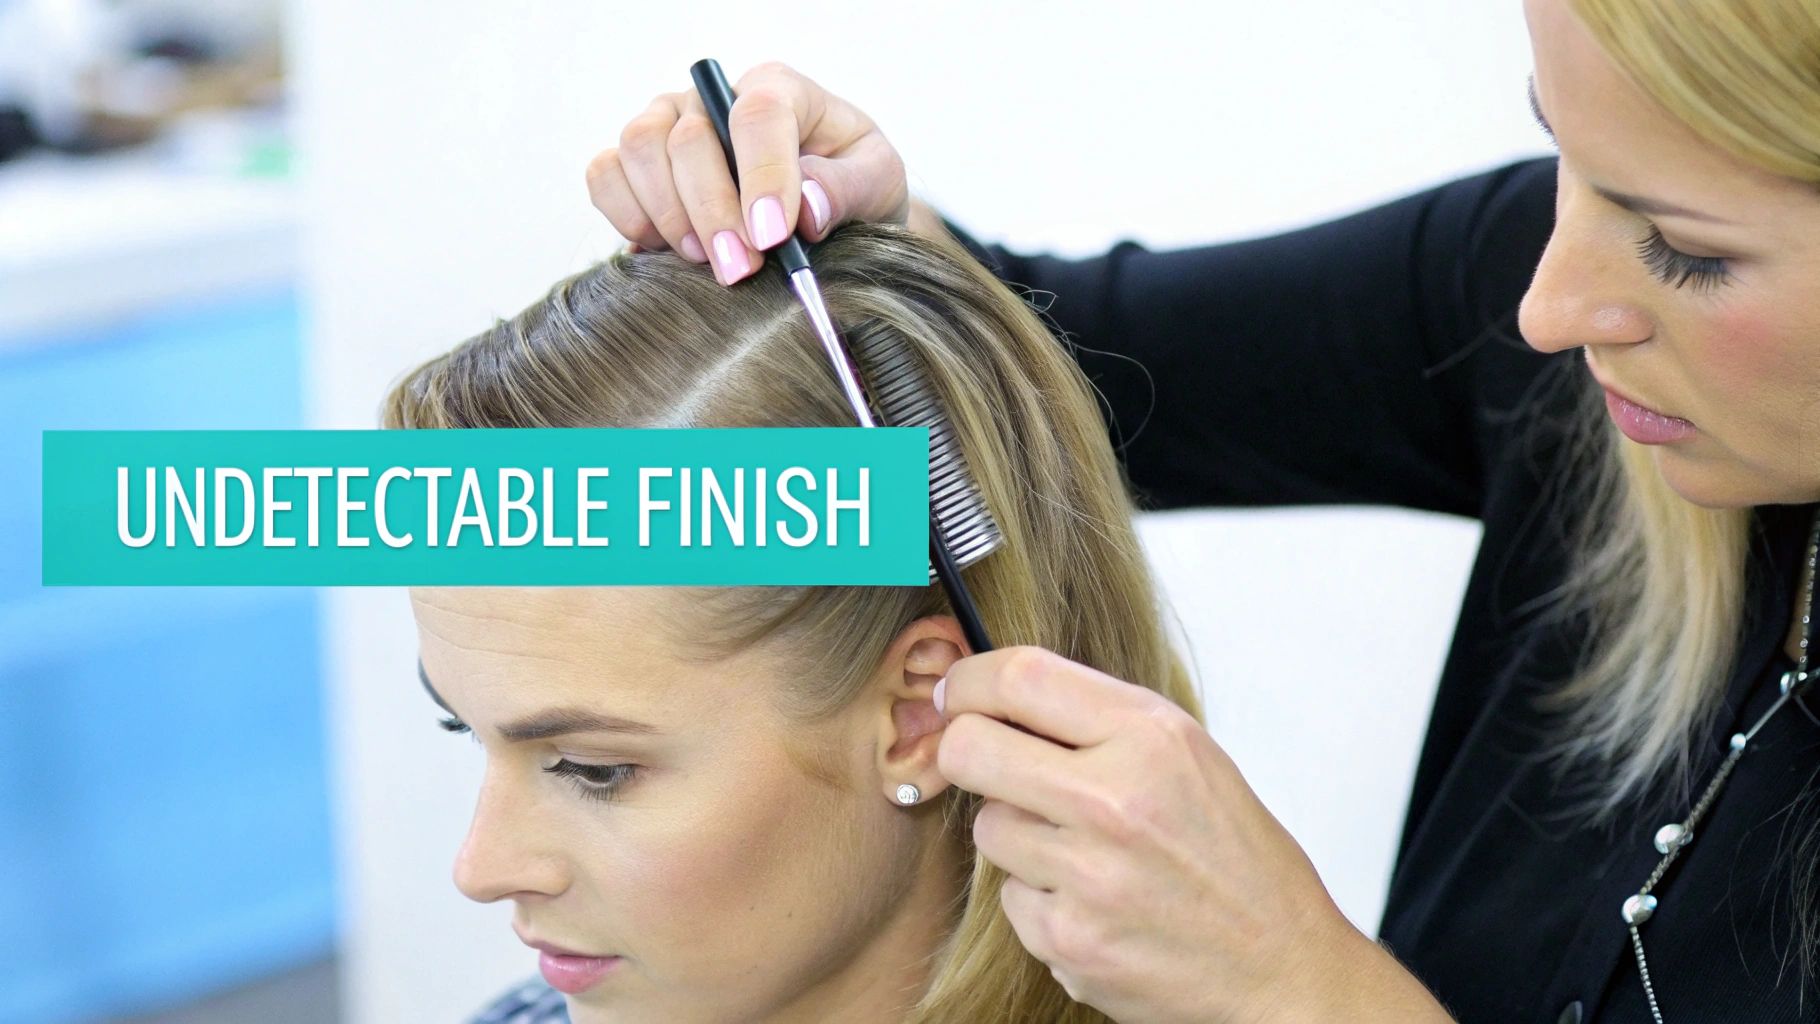
This is exactly what professional stylists do to get those flawless, celebrity-level installs. Trust me, with a bit of practice and the right tools, you can nail these techniques right at home.
Plucking the Hairline for a Natural Density
Let’s be real—most lace front wigs come out of the box with a super dense, almost too-perfect hairline. Your natural hair just doesn't grow that way; it's always a bit softer and thinner right at the front. Plucking is how we fix that. It's the process of carefully tweezing out some hairs to mimic that softer, more realistic gradient.
You’ll just need a good pair of tweezers and a little bit of patience.
- Set Your Part First: Before you even think about tweezing, decide where you want your part and comb it in. This focuses your work where it matters most.
- Work in Small Sections: Don't try to tackle the whole hairline at once. Use clips to get the bulk of the hair out of the way, leaving just the very front edge exposed.
- Pluck Behind the Hairline: This is key. Start tweezing a few hairs just behind the very first row. If you pluck the front row directly, you risk creating bald spots. The goal is to thin things out, not erase the hairline.
- Go Slow, Less is More: Pluck a few hairs, then comb everything back and take a look. You can always pluck more, but you can't put hairs back once they're gone.
A well-plucked hairline is the single most effective trick for a natural-looking install. The goal isn't perfection; it's to create the subtle imperfections that make a real hairline look real.
The synthetic wig market is huge, valued at $410.01 billion in 2023 and on track to hit $833.37 billion by 2032. A pro tip that makes all the difference with these units is managing that density. In fact, about 78% of wig wearers pluck 10-15% of the hairs at the front to get a more natural vibe. It's a simple step that has a massive impact. You can learn more about the latest trends in the synthetic wig market.
Creating and Styling Baby Hairs
Baby hairs can be your best friend for blurring the edge of the lace. They're those fine, wispy hairs that frame your face and create a soft transition. It's totally a stylistic choice—some people love them, others skip them—but they are fantastic for blending.
To make them, take a razor comb and gently pull out a few thin strands right along the wig's front edge. Then, just trim them down. You don’t want them too long, usually about an inch is perfect.
When it comes to styling, grab some edge control and a small edge brush (a clean toothbrush works great in a pinch).
- Dab a tiny bit of edge control onto the baby hairs.
- Use the brush to gently swoop and lay them against your skin, following the natural curve of your hairline.
- For that extra-sleek finish, tie a silk scarf or a melt band around your hairline for 10-15 minutes. This will set them perfectly in place.
The Final Blend with Makeup
This is the final magic trick that makes any last bit of lace completely vanish. Think of it like blending concealer—a little makeup on the lace can make it melt right into your skin tone.
Take a small makeup brush and gently tap a foundation powder or liquid concealer that’s a perfect match for your skin onto the lace. Pay special attention to the area around your part and along your hairline. This step gets rid of that grid-like look lace can sometimes have and creates a seamless transition. It's the detail that ties the whole look together.
Wig Removal and Aftercare to Protect Your Hair
Your install looks absolutely flawless, but the real test of a great wig experience is what comes next. How you take care of your wig—and your own hair underneath—is just as crucial as the application itself. It’s what keeps your unit looking fresh for months and protects your delicate hairline from any potential damage.
Let's get one thing straight: never just rip your wig off. I've seen the horror stories, and it's the fastest way to cause serious breakage and skin irritation, especially if you used a strong adhesive. Patience and the right products aren't just recommendations; they're non-negotiable for a safe, gentle removal.
Safely Removing Your Lace Front Wig
To get that lace to lift without a fight, you'll need an adhesive remover, specifically an oil-based one designed for lace glue. Be generous with it. Apply the remover all along your hairline, right on top of the lace where the adhesive is.
Now, give it a few minutes to work its magic. You'll know it's ready when you can feel the lace starting to lift away from your skin with zero effort. Gently start peeling the wig back, beginning at the front and moving toward the back of your head. If you hit a stubborn spot and feel any pulling, stop immediately. Just add a bit more remover to that area and give it another minute.
Takeaway: Don't ever get into a tug-of-war with your wig. Let the adhesive remover do all the work. It's designed to dissolve the bond so the lace lifts off effortlessly, protecting both the wig and your edges.
Washing and Storing Your Unit
Once your wig is off, it’s time for a little spa day. Before you even think about water, gently detangle the hair with a wide-tooth comb, starting from the ends and working your way up to the roots.
When you wash it, stick with a good quality, sulfate-free shampoo and conditioner. You'll want to focus the conditioner on the mid-lengths and ends to keep the hair silky, while avoiding the base where the knots are tied to the lace.
The best way to dry your wig is to let it air dry completely on a mannequin head or a proper wig stand. This is key for helping it keep its natural shape and style. Storing it this way also prevents a tangled mess, ensuring it’s pristine and ready for your next install. For a more detailed routine, take a look at our complete guide on how to care for human hair wigs.
Got Questions About Your Lace Front? We've Got Answers
It's totally normal to have questions, even if you’ve been installing wigs for years. Things pop up. Getting clear answers to the most common sticking points can be the difference between a frustrating experience and a flawless install.
Let's get into some of the questions I hear all the time.
How Long Can I Expect My Lace Front Install to Last?
This is a big one, and the honest answer is: it depends entirely on your application method and how you care for it.
If you go the professional route with a strong adhesive, you can realistically expect your install to hold for anywhere from one to four weeks. Keep in mind, your own body chemistry plays a huge role here. If you have oily skin or sweat a lot, you'll find the glue breaks down much faster.
On the other hand, if you're using a glueless method like a strong-hold spray or just the wig's built-in band, think of it as a daily style. This is actually a huge plus for anyone who loves giving their scalp a break at night.
Is It Really Possible to Install a Lace Front Wig Without Glue?
Yes, one hundred percent! Glueless installs are incredibly popular right now, and for good reason. Many modern wigs are designed with this in mind, coming equipped with adjustable straps and combs that give you a surprisingly secure fit right out of the box.
If you want a little more security without the commitment of glue, a good strong-hold spray is your best friend. Spritz it along your hairline on the wig cap, and it will create a solid, temporary bond that keeps your lace locked down all day. It’s a fantastic, beginner-friendly option that's much kinder to your edges.
The secret to a truly undetectable hairline is to copy what nature does. Natural hairlines are never perfectly straight or thick. Always take the time to pluck the hairline for a softer, more realistic density. And when you cut the lace, use a slight zig-zag motion—this small trick helps it melt right into your skin.
How Can I Keep My Edges Safe from Damage?
Protecting your natural hair, especially those fragile edges, is the most important part of wearing wigs. This is non-negotiable.
The golden rule is to never, ever pull or rip your wig off. Patience is key. Always reach for an oil-based adhesive remover to gently dissolve the bond before you even think about lifting the lace.
Also, what’s underneath matters just as much. Make sure your hair is clean, well-moisturized, and braided down as flat as possible. Using a quality skin protectant before the adhesive also creates a crucial barrier between the glue and your skin.
Ready to nail your installation with the best tools and top-tier hair? At Elise Beauty Supply, we've got you covered with everything from premium human hair wigs to all the must-have accessories for that perfect finish. Check out our collection and begin your journey to a flawless install today at https://elisebeautysupply.shop.
Refined using Outrank