
How to Make a Wig Look Natural for a Flawless Finish
The secret to a truly flawless wig install doesn't start with the glue or the baby hairs. It starts way before that—with the wig itself. If you want a wig that looks like it's growing right out of your scalp, you have to pick the right foundation. This first decision is everything; it sets the stage for how seamless your final look can be.
Choosing the Right Wig for a Natural Look

Turning a wig from something that just sits on your head into a look that feels completely yours is an art. But like any art form, your materials matter. Think about it: a flimsy canvas will compromise even the best painter's work. It's the same with wigs. The three things you absolutely need to get right from the jump are the lace type, the hair density, and the wig's overall construction.
Understanding Lace Types
The kind of lace on your wig’s frontal or closure is a total game-changer for getting that invisible blend. They aren't all created equal.
- HD Lace: This is the thinnest, most delicate lace you can get. It's practically invisible on any skin tone and gives you that perfect "scalp" look right out of the box. The catch? It's fragile, so you have to handle it with extra care.
- Transparent Lace: A fantastic and much more durable alternative to HD. Transparent lace is still very thin and melts beautifully into lighter skin tones. If you have a darker complexion, you'll just need to tint it for a perfect match.
- Swiss Lace: This is the reliable standard for a lot of great wigs. It's a bit thicker and tougher than HD or transparent lace, but it still gives a natural-looking finish once you customize and tint it properly.
Selecting the Right Density
Wig density is all about how thick the hair is on the cap. Getting this right is crucial, because a wig that’s obviously too thick is a dead giveaway.
For the most believable look, I always recommend a density between 130% and 150%. This range closely mimics the thickness of average natural hair. While higher densities like 180% or 200% can give you that ultra-glam, full look, they often come out of the box looking bulky and unnatural around the hairline without some serious plucking.
Key Takeaway: The goal isn't just to have more hair; it's to have realistic hair. A lower-density wig with a beautifully plucked hairline will always look more natural than a super-thick one with a harsh, dense front.
Human Hair vs Synthetic Wigs Compared
Choosing between human and synthetic hair is a big decision that impacts everything from styling to maintenance. Both have their pros and cons when it comes to achieving a natural look.
Here's a quick comparison to help you decide which is best for you:
| Feature | Human Hair Wigs | Synthetic Wigs |
|---|---|---|
| Appearance | Offers the most natural look and feel. The texture and movement are unmatched. | High-quality synthetics look very real, but can have an unnatural shine. |
| Versatility | Can be colored, permed, and styled with heat tools just like your own hair. | Cannot be colored. Heat-friendly options exist, but styling is limited. |
| Durability | With proper care, can last over a year. | Typically lasts 4-6 months with regular wear. |
| Maintenance | Requires washing, conditioning, and restyling, much like natural hair. | Holds its style even after washing. "Shake and go" convenience. |
| Cost | Higher initial investment. | More budget-friendly. |
Ultimately, the choice comes down to your budget, lifestyle, and how much time you want to spend on styling. For the most undetectable finish, nothing beats a well-made human hair wig.
Cap Construction and Creating a Flat Base
Finally, don't overlook the wig's cap and what’s going on with your own hair underneath. A good wig should have adjustable straps and combs to give you a snug, secure fit. If the wig is too loose or too tight, it just won’t sit right on your head.
Before you even think about putting the wig on, your natural hair needs to be as flat as humanly possible. Tightly braided cornrows or a clean, flat wrap create that smooth canvas you need. This prevents any lumps or bumps that would make the wig sit too high and look unnatural. This step is non-negotiable for a seamless fit.
The demand for realistic units has skyrocketed, with the U.S. hair wigs and extensions market hitting an incredible USD 2.79 billion in 2023. This is all thanks to better technology making wigs almost impossible to tell apart from natural hair. And at the heart of it all is customization—in fact, about 85% of wig wearers say that matching the lace to their skin tone is the most critical step for a flawless look.
If you're ready to find a great foundation, you can explore this curated collection of high-quality human hair wigs.
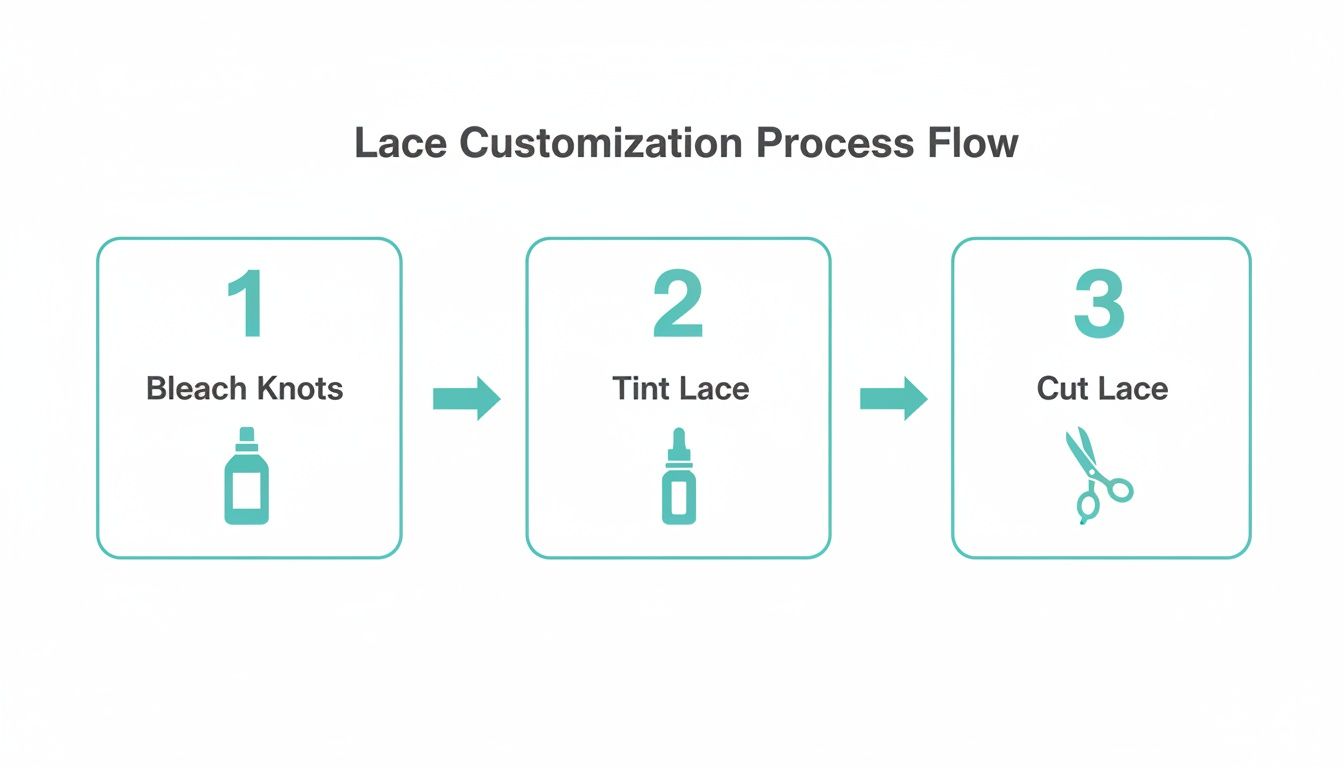
Making the Lace Disappear: A Guide to Customization
This is where the real magic happens. A wig straight out of the box is a great starting point, but it's the customization that transforms it into a truly undetectable, "what lace?" masterpiece. Taking the time to prep your lace is single-handedly the most important thing you can do to make a wig look like it's growing right out of your scalp.
We're going to break down the three essentials for a flawless install: bleaching the knots, tinting the lace, and cutting it just right.
Bleaching the Knots for a True Scalp Illusion
Take a close look at a new lace wig. You’ll see tiny black dots where each hair is hand-tied to the grid. Those are the knots, and they’re often the biggest giveaway that you're wearing a wig. The goal of bleaching isn't to turn them platinum blonde, but to lift them just enough to make them translucent, so they vanish against your skin.
It’s a delicate process. If you overdo it, you can weaken the knots and cause shedding, so a gentle hand is key.
Here’s my tried-and-true method:
- Get your mix right: I always use a professional lightener like BW2 powder with a 20 or 30-volume developer. You want a thick, paste-like consistency—think of creamy frosting. If it's too runny, it will seep through the lace and accidentally bleach the roots of the hair.
- Apply with care: Flip the wig inside out. Using a small tinting brush, gently dab the mixture onto the lace. Don't press down! The idea is to coat the knots on the surface without letting the bleach soak through to the hair itself.
- Watch it closely: Let the bleach process for about 15-25 minutes. Keep a close eye on it. Once the knots lift to a honey blonde or light brown, you’re done.
- Rinse and neutralize: Wash the bleach out completely with cool water. Follow up with a neutralizing shampoo to stop the chemical reaction in its tracks and restore the wig's pH balance.
My Pro Tip: Before you even start, protect those baby hairs. I like to apply a thin layer of Vaseline or a thick conditioner along the inside of the hairline. It creates a barrier so the bleach only touches the knots, not the hair.
Tinting the Lace to Match Your Skin Tone
Once the knots are bleached, the next step is tinting the lace so it melts right into your complexion. A lace that’s too light, too dark, or has the wrong undertone is an instant giveaway.
Luckily, you've got a few great options here, and the best one often comes down to personal preference.
My Go-To Tinting Methods
- Lace Tint Spray: This is my favorite for a quick, even finish. These sprays come in a variety of shades. Just give the underside of the lace a light, even spritz, then let it air dry or hit it with a blow dryer on the cool setting.
- Your Own Foundation: In a pinch, your makeup bag is your best friend. After you’ve installed the wig, take a flat brush and apply a bit of your liquid foundation or concealer to the parting space and along the hairline. It's a fantastic temporary solution.
- The DIY Tea Method: For a more natural stain, you can't go wrong with good old-fashioned tea. Steep a couple of black tea bags in hot water, let it cool completely, and then submerge the lace for 10-20 minutes. Just pull it out when it reaches a shade you like.
Getting the lace tint right is a total game-changer. In fact, some beauty industry polls suggest that a perfect lace match can make a wig up to 80% less detectable. It’s no wonder that industry stats show about 65% of experienced wig wearers see bleaching knots as their top priority for a natural look—a key factor in the market's recent growth. If you're interested in the data, you can read more about global wig market trends.
Cutting the Lace: The Final Touch
The last step before installation is trimming that excess lace off the front. Whatever you do, don't cut in a perfectly straight line. Real hairlines are never that neat and tidy, and a straight edge is incredibly hard to blend.
Instead, you want to mimic the soft, slightly uneven look of a natural hairline.
Here’s how to nail it:
- Secure the wig on your head or a mannequin head to keep the lace taut.
- Use a small, sharp pair of scissors or even an eyebrow razor for maximum control.
- Start cutting from one side of the forehead, following the general curve of the wig’s hairline.
- Use short, slightly jagged snips instead of one long, continuous cut. This little trick makes all the difference in creating a softer, more believable edge.
- Get as close to the hairline as you can without snipping any of the actual hairs.
By taking the time to bleach, tint, and trim, you’re not just prepping a wig—you're creating a custom foundation that will blend so seamlessly, no one will know it’s not yours.
Creating a Realistic Hairline and Parting
Once you’ve got the lace prepped, the next challenge is nailing the hairline and the part. Honestly, a super dense, ruler-straight hairline is the biggest giveaway that you're wearing a unit. The real magic is in the tiny, perfect imperfections—those subtle thinned-out spots, the soft baby hairs, and a part that actually looks like scalp.
These are the details that take a wig from looking pretty good to completely undetectable. It’s all about mimicking how hair naturally grows.
Think of it like this: bleaching the knots makes the "scalp" look real, tinting makes it match your skin, and cutting the lace removes the excess. Plucking is the next step that sculpts the actual hairline.
The Art of Plucking for a Softer Hairline
Wigs almost always arrive from the factory with a hairline that's way too thick and uniform. Plucking is just what it sounds like: you use tweezers to carefully thin out that density. This creates a much softer, more gradual transition from your skin to the hair. You’re essentially creating a custom gradient.
Here's how I get the best results when I pluck a wig:
- Work in Sections: Get the wig on a mannequin head. Use clips to pull all the hair back, leaving just a thin line of hair along the very front edge to work on.
- The Right Tool is Everything: A good, sharp pair of slanted tweezers will make this process a thousand times easier. You need that precision grip.
- Pluck Behind the Hairline: This is the most important tip. You never want to pluck the very first row of hairs. Instead, target the hairs right behind it. This thins out the bulk without leaving bald spots right on the edge.
- Embrace Imperfection: Your natural hairline isn’t a perfect line, and your wig’s shouldn’t be either. I focus on creating subtle dips and peaks, especially around the temples, to copy a real growth pattern.
Crafting Believable Baby Hairs
Baby hairs are fantastic for blending the edge of the lace into your skin, but the secret is to be subtle. You’re going for soft, wispy strands that frame the face, not a heavy, gelled-down design that screams for attention.
Here’s my no-fail method for natural-looking baby hairs:
- Isolate Tiny Strands: Grab a rattail comb and pull out a few very small, wispy sections of hair from the very front of the hairline. Less is more.
- Trim, Don't Chop: I use a small pair of scissors or even an eyebrow razor to trim these little hairs down. Don't cut them blunt or too short; varying the lengths slightly makes them look way more realistic.
- Style with a Light Touch: Use a tiny bit of edge control or mousse and a soft brush (like a toothbrush you only use for hair) to gently swoop them into place. Always follow the natural direction the hair wants to go.
Matching the hair's thickness to real life is a huge part of the illusion. Most human hair wigs with a 130-150% density look the most natural, which is why 62% of wig wearers prefer them. For baby hairs, just styling 15-20 individual strands can fool 90% of observers, a technique you'll see in 77% of social media tutorials.
Achieving a Flat, Scalp-Like Part
Nothing looks more "wiggy" than a bulky part that sits up off your head. The goal is to get that parting space to lie completely flat, creating a crisp line that looks just like your scalp. This is where your hot comb and some concealer become your best friends.
Pro Tip: The "hot comb method" is non-negotiable for a seamless look. Set it on low-to-medium heat and gently press the comb along both sides of your part. This flattens the roots right down, making the wig sit flush against your head.
After you’ve flattened the part, it’s time for the final touch.
- The Concealer Trick: Using a small, flat makeup brush, dab a concealer that's one shade lighter than your skin tone directly onto the lace inside the part. This simple step creates that perfect illusion of scalp.
- Set with Powder: To get rid of any shine and blend it seamlessly, lightly dust the concealer with your regular face powder.
These are the meticulous little steps that really make a difference. Getting your install perfect takes practice, and you can get more great advice from our guide on how to install a lace front wig. When you take the time to customize the hairline and define a flat part, you transform your wig from just a hairpiece into a flawless, confidence-boosting part of your look.
Securing Your Wig for Natural Movement
You’ve plucked, bleached, and tinted your lace to perfection. Now for the final, crucial step: making sure that wig stays put. Nothing ruins the illusion faster than a unit that lifts or shifts around. Real confidence comes from knowing your hair will move with you, not on you, whether you're just living your life or dancing the night away.
The great news is you've got options. From completely glueless methods to adhesives that can last for weeks, there’s a perfect fit for your lifestyle, skin sensitivity, and how long you plan to wear your unit. Let's break down the best ways to get that secure, comfortable fit that looks and feels like it’s growing right from your scalp.
Choosing Your Security Level: Glueless vs. Adhesive
The "glued vs. glueless" debate is a big one, but honestly, there's no single right answer. It all comes down to what works for you, your daily routine, and your comfort level.
Glueless Methods for Everyday Ease
For anyone who loves the freedom of taking their wig off at night, glueless is the only way to go. It’s also a lifesaver for those with sensitive skin who can't tolerate glues and gels.
- Adjustable Straps and Combs: Most quality wigs come with these built right in. You can tighten the elastic band at the nape for a snug feel, while the combs help anchor the wig to your braids or wig cap. Simple and effective.
- The Wig Grip Band: This little accessory is a total game-changer for glueless installs. A wig grip is a velvety headband that creates friction between your head and the wig cap, stopping it from slipping or sliding. It’s surprisingly secure.
These methods are more than enough for daily wear and low-key activities, giving you a reliable hold without any mess or potential irritation.
My Favorite Trick: For an unbelievably secure glueless fit, I like to position the wig’s combs so they slide under the wig grip band, not into my hair. This locks everything together for a hold that feels solid, without a single drop of product.
The Power of Adhesives for a Longer Hold
When you need that wig to stay locked in for days—or even weeks—adhesives are your best friend. This is how you get that truly "melted" look where the lace just vanishes into your skin.
A couple of products dominate the scene:
- Got2B Glued Gel: While not technically a wig glue, this yellow tube is a cult favorite for a reason. It gives you a strong, temporary hold that’s water-resistant (not waterproof!) and comes off easily with water. It's perfect for a weekend look.
- Ghost Bond or Bold Hold: These are the heavy hitters. As professional-grade, waterproof adhesives, they're designed for long-term wear, often lasting from one to three weeks. They offer an incredibly strong bond but demand a special remover and careful application to protect your skin and your lace.
No matter which adhesive you use, skin protectant is non-negotiable. Applying a thin layer to your hairline first creates a barrier that not only shields your skin but also helps the glue grip even better.
Mastering the Melt with an Elastic Band
Whether you used a gel, a glue, or even a strong glueless spray, the secret to a flawless install is the "melting" process. This simple technique uses pressure to press the lace flat against your skin, making the edge completely disappear.
It couldn't be easier:
- Once your wig is on and you've applied your chosen product along the hairline, grab a wide elastic band (often sold as a "melt band" or "edge scarf").
- Tie the band firmly around your hairline, making sure it covers all the lace you just secured down.
- Now, just let it sit for at least 15-20 minutes. This is the perfect time to finish your makeup or start styling the hair.
- When you gently slide the band off, you'll see the lace has blended seamlessly into your skin. That's the perfect scalp-like finish we're all after.
This final touch is what elevates an install from good to truly undetectable. Pick the right security for your needs, finish with a proper melt, and you'll have a wig that not only looks amazing but feels so secure you’ll forget it’s even there.
Styling and Maintaining a Natural Appearance
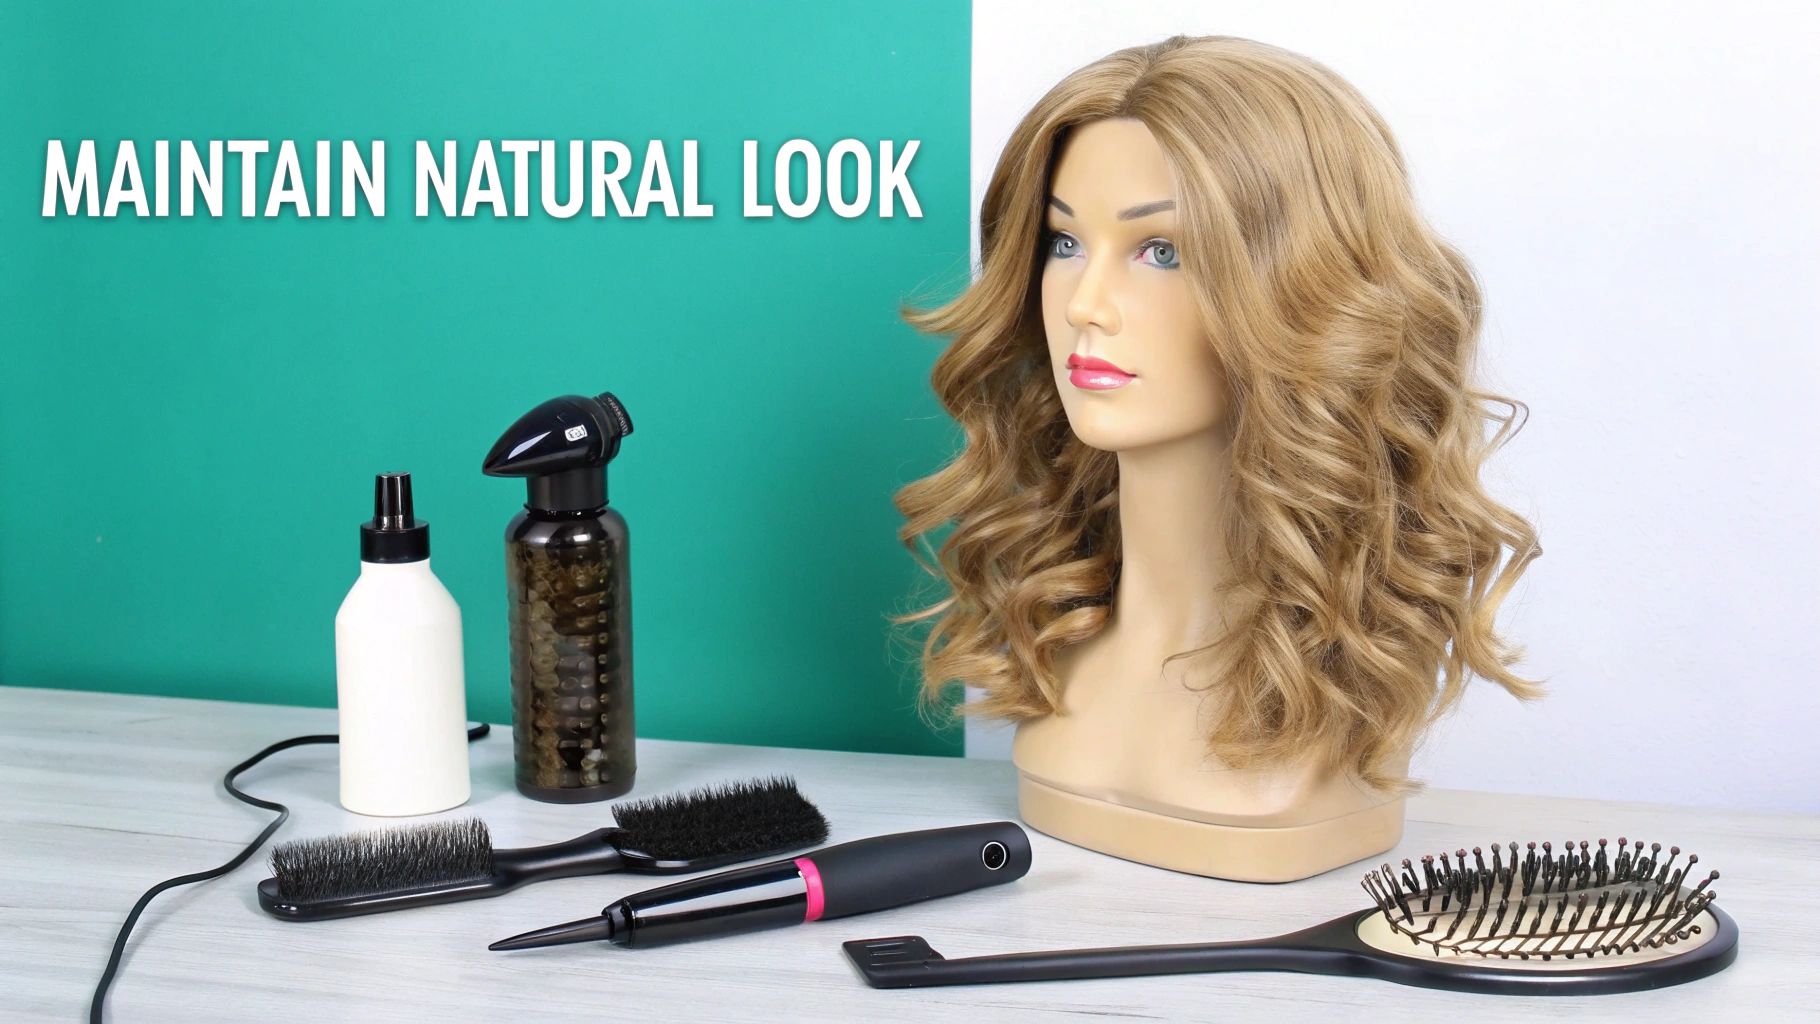
This is where the real magic happens. The final styling details and a solid care routine are what truly separate a good wig from a great one. These habits are what protect your investment, making sure your unit looks just as stunning on its hundredth wear as it did on day one.
It all boils down to treating the hair with respect, whether it's premium human hair or a high-quality synthetic. From adding a bit of believable volume to preventing those frustrating mid-day tangles, the right techniques make a world of difference. Mastering these simple habits will elevate your wig game entirely.
Strategic Styling for Believable Movement
The way you style your wig has a massive impact on its realism. We've all seen wigs that look stiff—the curls are a little too perfect, the strands are stick-straight. The goal is to create soft, lived-in movement that mimics how your own hair would behave.
With human hair wigs, heat tools are your best friend. A good flat iron can create those effortless beachy waves, while a curling wand can give you soft, bouncy curls. Just remember to always start with a quality heat protectant spray to shield the delicate hair from damage. Here's a pro tip I swear by: curl different pieces in slightly different directions. This simple trick breaks up the uniformity and keeps it from looking too "doll-like."
Key Takeaway: For an instant, natural-looking volume boost, focus your attention on the roots. A hot comb on its lowest setting or a blow dryer with a nozzle attachment can gently lift the hair at the base. This tiny step is the secret to avoiding that dreaded "helmet head" and giving your style authentic body.
If you’re working with a synthetic wig, be extremely careful. Only use heat tools specifically designed for synthetic fibers, and always keep them on the lowest possible setting. A clothing steamer is actually one of the best tools for reshaping a synthetic style without running the risk of melting the strands.
An Effective Wig Maintenance Routine
Consistent care isn't just a suggestion—it's non-negotiable if you want to extend your wig's life and keep it looking fresh. A simple, regular routine is your best defense against the tangling, shedding, and dullness that can make a beautiful unit look worn out.
Here’s a quick rundown of the essentials:
- Washing and Conditioning: A good rule of thumb is to wash your wig every 7-14 wears. This depends on how often you wear it and how much product you’re using. Stick to sulfate-free shampoos and conditioners made for wigs or color-treated hair.
- Detangling with Patience: Always, always use a wide-tooth comb. Start from the ends and gently work your way up to the roots to avoid causing tension and shedding. Never brush a wig when it's wet! That’s when the hair is most fragile and prone to stretching or breaking.
- Proper Air-Drying: After washing, gently squeeze out the excess water with a towel—please, don’t wring it out! Then, place the wig on a mannequin head or a proper wig stand to air-dry. This helps it keep its shape and avoids any unnecessary heat damage.
If you want a deeper dive, our comprehensive guide on how to care for human hair wigs is packed with more professional tips and tricks.
To keep things simple, a weekly checklist can be a lifesaver, especially when you’re just starting out. It ensures you never miss a step in keeping your human hair wig in pristine condition.
Weekly Wig Maintenance Checklist
| Task | Frequency | Pro Tip |
|---|---|---|
| Gentle Detangling | Daily (before & after wear) | Use a wide-tooth comb starting from the ends to prevent breakage. |
| Spot Cleaning | As needed | Address any small makeup stains on the lace with a cotton swab and alcohol. |
| Washing & Conditioning | Every 7-14 wears | Use lukewarm water and sulfate-free products to preserve color and texture. |
| Deep Conditioning | Every 3-4 washes | Let a deep conditioner sit for 15-20 minutes for extra hydration. |
| Air-Drying | After every wash | Place on a wig stand away from direct sunlight to maintain its shape and color. |
Following a consistent schedule like this turns maintenance into a simple habit rather than a chore.
Proper Storage to Preserve Your Style
Believe it or not, how you store your wig when you’re not wearing it is just as important as how you wash it. Tossing it into a drawer is a guaranteed recipe for a tangled, misshapen mess.
Your best bet is a mannequin head or a wig stand. These tools help the wig maintain the shape of its cap and prevent the hair from getting crushed or matted. If you're tight on space, you can also carefully store it in its original box or a silk/satin bag, but only after you've made sure it's completely detangled.
Proper storage doesn't just protect the hair fibers—it also saves you a ton of prep time for your next wear.
Your Top Wig Questions, Answered
Even when you think you've got it all down, some common frustrations can still get in the way of a perfect install. Ever dealt with a wig that sits too high on your head or lace that stubbornly refuses to blend? You’re definitely not alone. Let’s tackle some of the most persistent questions I hear and get you over those final hurdles.
How Do I Fix That Bulky "Wiggy" Look on Top?
Ah, the dreaded "helmet head." This happens when the top of the wig looks puffy and unnatural, usually because the roots won't lie flat against your scalp. It’s one of the biggest giveaways that you're wearing a unit.
Your secret weapon here is a hot comb. On a low-to-medium setting, gently press the comb right at the roots and along your part. This simple move flattens the hair, making it look like it's growing directly from your scalp. For some extra hold and a super sleek finish, run a wax stick over the area before you press it.
Also, don't forget what's underneath. If your natural hair isn't braided down as flat as possible, it's going to create volume that pushes the wig up. A smooth foundation is everything.
Why Won't My Lace Match My Skin Tone?
Getting the lace to disappear is the ultimate goal. If you’ve tried tinting and applying foundation but it still looks a little off, the culprit is probably your skin's undertone. Most of us just try to match our surface skin color, but it’s the undertone—cool, warm, or neutral—that really makes or breaks the blend. Make sure whatever you're using to tint complements your specific undertone.
Here's a little trick that works like a charm: dust some of your regular face powder on the inside of the lace before putting the wig on. This gives you a soft, diffused tint from underneath that melts right into your skin and makeup.
Expert Insight: For transparent lace that looks ashy or too light on darker skin, the tea bag method is a classic for a reason. Just steep a black tea bag in warm water, let it cool, and gently dab the stained water onto the lace. It creates a beautiful, warm-toned stain that you can build up, and it often looks far more natural than makeup.
What's the Single Biggest Mistake Beginners Make?
Hands down, the most common mistake is being too scared to customize the hairline. When you take a wig straight out of the box, it has this super dense, ruler-straight hairline that just screams "wig." I get it—plucking a brand-new unit can be intimidating, but it is absolutely essential for a realistic look.
Your natural hairline isn't perfect; it's softer and has a gradual transition from your forehead to the denser hair. You don't have to be a pro to get this right.
- Take it slow. Grab a good pair of tweezers and only pluck a few hairs at a time from just behind the very first line of hair.
- Create imperfection. Your goal is to break up that harsh, solid line and make it look a little more random.
- Remember the golden rule: You can always pluck more, but you can't add hairs back. Even a tiny bit of plucking makes a world of difference.
Can a Synthetic Wig Ever Look as Natural as Human Hair?
While nothing can quite replicate the movement and feel of a quality human hair wig, you can get a high-quality synthetic wig looking incredibly natural. The biggest giveaway with synthetic hair is that plastic-y, unnatural shine.
Luckily, the fix is super simple. A quick spritz of dry shampoo or a light dusting of translucent face powder will instantly cut the shine and mattify the fibers. After that, it’s all about applying the same techniques you would for a human hair wig: pluck the hairline, create a believable part, and make sure you tint and trim the lace correctly. Just remember to use only low-heat tools made for synthetics or a steamer to add soft waves without melting the fibers.
At Elise Beauty Supply, we believe everyone deserves to feel confident and beautiful. Explore our premium collection of human hair wigs, extensions, and styling essentials to achieve the flawless, natural look you've always wanted.